Speaking of the mini version of the millet box, I believe many users concerned about the TV box will not be unfamiliar. With a compact design and powerful performance design and deeply loved by users. In addition to the DUI screen-casting capabilities of the MIUI system and a variety of third-party players, you can also use an app called Screencast Artifacts to move your mobile phone or any media resource in the network without any effort. With your fingers, you can easily project them to a TV (or monitor) that is connected to a box, and even the content on the screen of your phone is really easy to use.
In addition to a mobile phone or various mobile terminals, in fact, the computer can also be used to cast screens. The box connected device is used as a second expansion screen, and various media files are directly projected onto a larger screen to be played. The viewing experience will definitely be obtained. Obviously improved. There are some slight excitement to think about it. However, due to some interface limitations and compatibility issues, the actual operation is more difficult. In addition to the need to install a player that supports DLAN screencasting on a computer, you have to get all sorts of complicated sharing settings. Even if you do, you may have a bunch of resources that can't be played and you can't play with them. I believe you have this too. Painful experience.
Is it really impossible to make computer screen shots more simple and reliable? This is also a problem that I have been researching. However, I have seen many related tutorials and tried many solutions, but I have never been satisfied with them. Until an accidental chance, he discovered that an artifact finally solved the pain point of this age-old difficulty. It not only can complete the projection of various media resources, but also has almost no problems in testing with various files, and it can be like a mobile phone. Projecting the computer screen with ease, I believe that for many people who often need to demonstrate PPT, this function is simply a godsend, so today let me teach you how to achieve it all.
Preparation tools
1. Millet box (mini box) and audio/video output device (TV, projector, monitor, etc.) that supports connection
2. A PC with a Windows operating system (Win7 environment as an example)
3. Wireless WIFI hotspots (without forcing connection to external networks)
4. PC and box software AirPin (PC side version: 1.4.9 box side version: 2.4.7)
install software
Before entering the topic, the most basic and critical step is the need to install the PC-side and box-side APPs of this magic screen-casting software AirPin into the corresponding devices, and complete the corresponding configuration. You can directly download the resources in the appendix at the end of this post. This is the best available version. It is not recommended to re-search and install other similar resources on the Internet, or upgrade to a later version.
1. Box side installation and configuration
It is recommended that you install the box-side software first. Before installing, you need to turn off the DLAN function that comes with the system so as to avoid conflicts with the software itself. Use millet remote control operation, in order to enter the "millet box settings" - "accounts and security" - "Milliant security settings ("security" column)" and close the "DLAN service" function can be.


Then copy the “AirPin box-side (2.4.7).apk†file to the mobile phone first, and install it in the box through the screen-casting artifact. You can also use other methods to complete the installation. The specific method you can search in the rice altar or Baidu This will not be explained here. After the installation is complete, open the AirPin(PRO) application. The first run will pop up a prompt box and press “OK†to continue.


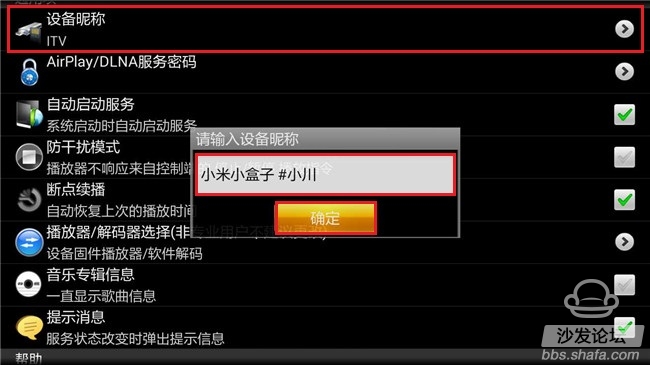
The following need to be in the "DLAN" column, make sure that "DLAN DMR" item is always checked (the default is checked), so that the box will only open the DLAN entry of the screencast program. If multiple devices with DLAN entries are connected to the same LAN segment (such as other network set-top boxes, smart TVs, etc.), it is advisable to set corresponding names for the devices being screened, so that they can be faster when the screen is pushed. Targeting it, it is also recommended to set a screencast password so that authentication is required during the operation to avoid illegal pushing of content by other devices on the same network segment. In the "General Items" column, enter the "Device nickname", and then take a representative name for the box. After the input is completed, press "OK". Enter the "AirPlay/DLAN Service Password" item and set a screencast password of 8 characters or less.


After completing the above operations, you need to restart the screen-related services to make the settings take effect. It is recommended to restart the box directly. Long press on the red power button on the remote control, select and enter "restart" to perform warm-up operation. After reentering the system, run the program again and press the Home button to put it in the background. Because the millet box currently shuts down the power-on permission of all third-party APPs, after each time the box is re-opened and the screen-cast operation needs to be performed, the software must be run once to start the related services before the push operation can be performed on other devices. Otherwise, this box will not be found.

2. PC installation and configuration
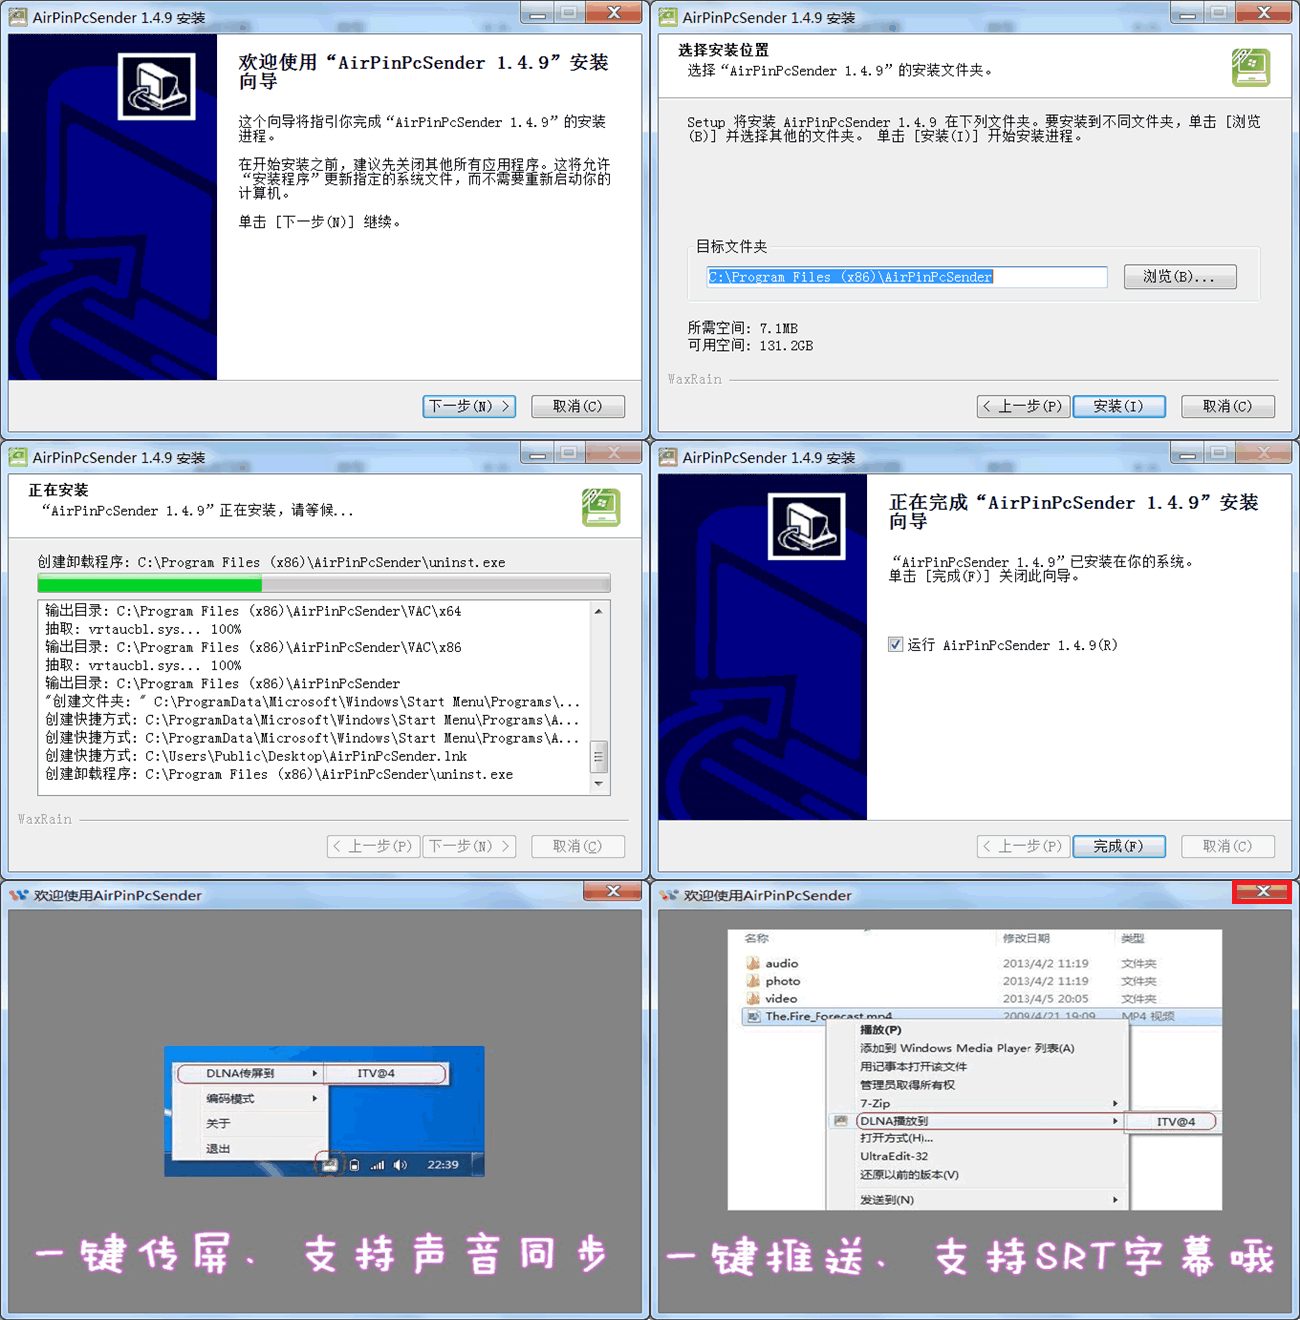
Next, you need to install AirPin software on the PC that launches the screencast. Open "AirPin PC (1.4.9).exe", like installing other applications, follow the wizard prompts to complete the operation, the method is very simple. The boot description window will pop up when you start it for the first time. Click the "X" in the upper right corner of the window to close it.

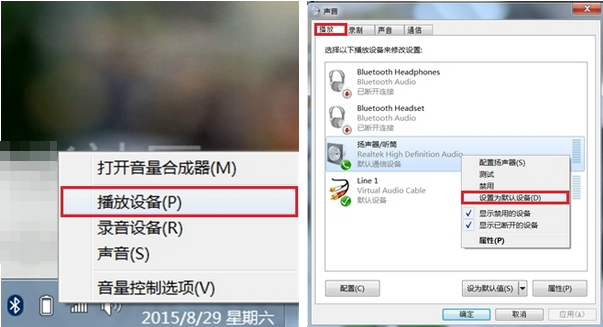
In addition, the program also needs to install a corresponding virtual sound card driver on the PC. It is recommended to allow it to be installed so that when the screen image is projected on the box in real time, it can also support audio output. Close the boot window will pop up the appropriate prompt box, then click "OK" to begin the installation, the system may pop up after the driver installation verification dialog box, check "Always trust the software from "NTONYX Ltd." ( A).", and then click "Install" button to complete the operation, the next time you install the driver will not be prompted for verification.

The most important part that everyone looks forward to is that I believe that after reading the following content, you will feel that the original screen shot from the PC to the box, you can also operate like a mobile phone so easily, without tedious configuration process, but also do not have to face A lot of problems, simply So easy, not get up quickly!
1. The projected screen is mirrored to the box
With the development and popularization of media technologies, traditional display tools such as blackboards and presentation cards will gradually be eliminated and replaced by various PCs and projection devices. This has become the most popular method of information display and has been widely used in teaching exchanges, conferences, publicity, and speeches. However, due to limitations of the presentation environment, hardware conditions and other factors, it is inevitable that the PC will be connected and configured with other output devices, causing some inevitable troubles. For example, you find that because the interface is not matched or incompatible, the HDMI cable cannot connect to the laptop. How can you get out of the picture? Of course, the PC will be bound by the more damn HDMI cable. The thorny situation where the length of the cable is not enough due to higher causes of the installation of the television. There are even some PC devices that do not have an HDMI video output at all, and no adapter devices, like most desktop computers. I believe you may have encountered such a situation more or less, especially before each meeting, it is indeed a matter of swiftness, scratching your head, and trying to find a way to get in touch with you. It really cannot be disturbed.
In fact, as long as you have a small box of small millet, in addition to carrying a waywardness to watch large movies while on a business trip, it can also be used for a great purpose during classes, meetings, and lectures. In fact, as long as your PC supports connection to a wireless network and there is a reliable WIFI signal in the demonstration environment (even if it does not matter, you can create a temporary using a PC's own wireless network card or various portable WIFI, portable or mini routers, etc. Hotspot), you can directly connect the box to the output device through the HDMI cable. You can directly project the screen content onto the screen without any complicated steps. The PC can also be within the hotspot coverage area. Moving freely, will no longer be constrained by the more tasteless lines, the effect is absolutely leveraged.
Here's to tell everyone how to achieve this magical function! First, you need to connect the PC and the box in the same LAN hotspot environment. This doesn't require me to emphasize it any more. Otherwise, you don't want to communicate with each other. Then you can run AirPin screencasting software on the box and the PC, and start the relevant screen-casting service. In the lower right corner of the PC, there will be a green icon. Move the mouse to it. Left click or right click on it to open the function menu, then move to the “Screen mirror to†menu item and click on the box device you want to project. If a DLAN key is set on the box, verification is also required before the software exits.


Of course, you can also use this method to project the screen image and audio on the PC onto multiple output devices covered by the same hotspot to complete the display at the same time, and to achieve this, you don't need to use any extension cable anymore. Is the auxiliary equipment very simple and practical?


2. Push media files to the box
Although the large-capacity hard disk in the PC-side device provides a good storage channel for many media resources, especially the relatively large files, all kinds of high-definition 3D Blu-ray source and so on. However, for ordinary home or portable PC devices, limited by the hardware and decoding capabilities of the output devices, when playing a variety of media resources, whether it is picture quality, sound effects, or even fluency, usually can not be satisfactory Degree. So there are more and more clever users who choose to transfer these resources to televisions and even home audio players. In a variety of intuitive experiences, they can be a few seconds away from the PC. It has to be said that this is indeed a very good complementary solution.
However, transferring these resources to other output media, such as television, is usually not an easy task. The most stupid way is to copy the resources to large-capacity media such as mobile hard disks and play them on a TV or set-top box. However, this way Not only does it take a lot of time, but it is also limited by the space and read/write capabilities of the mobile media itself. Especially when playing some high-definition film sources, the hardware itself cannot handle the speed, which is likely to cause Caton to not even support playback. For users who use routers to create WIFI hotspots, they can create shared folders or use player push. However, you need to get rid of the tedious SMB and DLAN settings and services of various Win systems, such as opening the Guest guest account and enabling network discovery. And so on, you may also be plagued by issues such as the inability to play resources due to compatibility issues, and such programs are not safe.
The AirPin screencasting software introduced for everyone today is to solve these problems and pain points. Not only can the screencasting of media resources become convenient and simple, but also stable and reliable, and the resources and formats supported are also very numerous. , as long as it is a picture, video and music type of file, you can quickly push push screen, maybe you only know how powerful it is to use it, the following tell you how to achieve it!
The software can push media files to the box by two methods. One is to click on the green chart in the task bar, move the mouse to the “push media to†menu item, select the pushed box object and click, The popup file opens the selection dialog. At this point, find and select a media file that you need to push and play. It can be a file on the PC's local hard disk, or it can be a resource on the LAN or in the mobile media, and then click the "Open" button. It will be easy to play the file on the box immediately.

Of course, in addition to the above methods, there is a simpler and more crude push method. You can also directly find and select a file to be pushed in the explorer, right click on it, you can see that there will be an additional parent menu item “DLAN Play toâ€, move the mouse to it, select and click Pushed box devices can also quickly complete resource screening. You did not even open and play this media file during this period. Is it really embarrassing?

3. Push URL address resources to the box
In addition to pushing local media files, AirPin screen-casting software can also be done by entering a URL that points directly to the streaming media resource. After success, the address will be opened on the box and the resources will be played. This URL can be an absolute path to a media file, or it can be an access and download link address of an online media resource in the network. So even if it is a variety of media resources on a web page, it can be instantly played on a box, just like Many browsers now have the same projection plug-in functionality.
However, most online video websites usually hide or block the real-play address of the resource for the anti-theft chain. However, for some websites, such as most of the videos on Youku, we can still use some sniffing tools to crack the real address. Resource addresses, and push them directly to the box, do not need to download to the local and complete the operation.
The operation method is also very simple. First, the complete play link address of the media resource that needs to be pushed is selected, copied to the clipboard, and right-clicked on the green icon in the lower right corner of the task bar. Move the mouse to the "Paste Media URL" menu item, click to select the box device to be pushed, then paste the address in the pop-up dialog box and click "OK" button to play the resource pointed to by the link on the box.

4. Media playback control instructions
In the process of pushing media resources to the box and playing it, you can also directly use the playback controller of the software to achieve the media volume, playback progress, switch to the same directory on the PC / next file, pause / Play and stop (exit playback) wireless control, in addition to browsing picture files, also supports the rotation of the picture, it is indeed very convenient.

When using the software player's own media player on the box side to play the pushed resource, press the back button on the remote control to bring up the control interface, and achieve playback progress adjustment, pause/play and stop (exit playback). Screen scaling, player and decode switching, and jump software setting control functions, but it does not support switching files up or down and adjusting the volume (can be adjusted using the volume + button on the remote control).

When the audio file is played, the four interface pictures will be randomly switched on the playing interface. Pressing the back button will pop up a confirmation dialog for playing in the background. The player can be placed in the background to continue running without affecting the box. On the other operations.

Millet box mini version best partner ---- sofa butler, installation tutorial: a key to direct
Millet box mini version More information: One-touch
Millet box mini version playing machine skills, resources collection: a key to direct
Carbon Fiber Rigid Felt Board,Heat Insulation Hard Felt Ring,Conical Carbon Fiber Hard Felt Ring,Carbon Fiber Heat Insulation Hard Felt
HuNan MTR New Material Technology Co.,Ltd , https://www.hnmtr.com