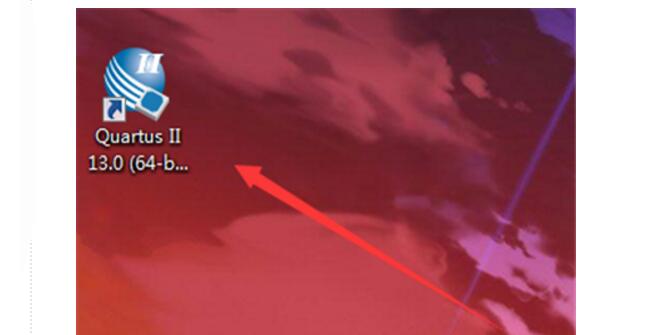
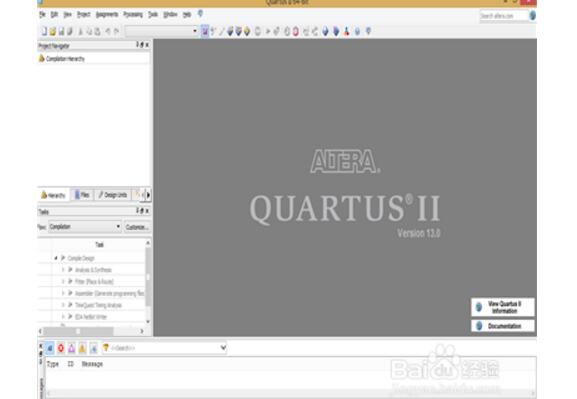
1, first find the Quartus II software on the desktop, then double-click to open. After punching, there will be an initial screen (pictured).
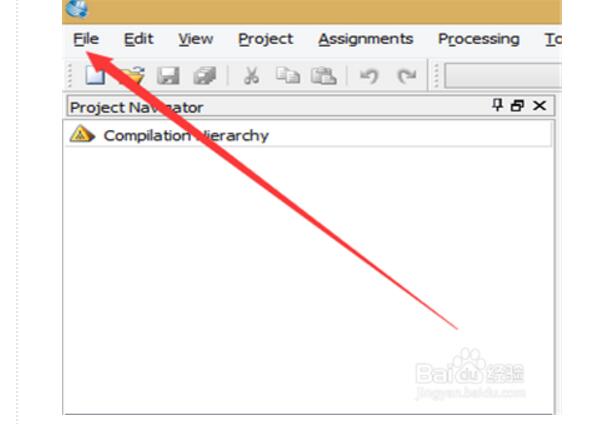
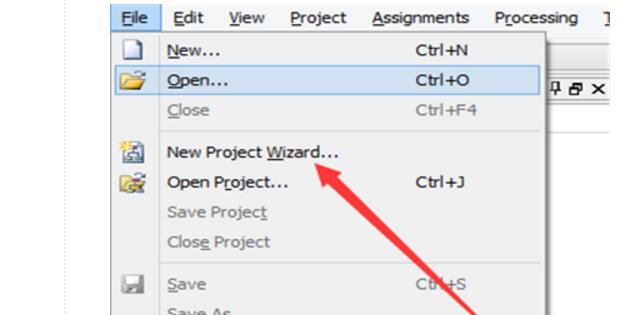
2, in the upper left of this interface to find File click, appear menu, select New Progect wizard option click.
3. After popping up a new interface, click on the next step below. The new interface selects the folder that was prepared in advance, and then names the project. Click on the next step below. An English box pops up and clicks on the No.
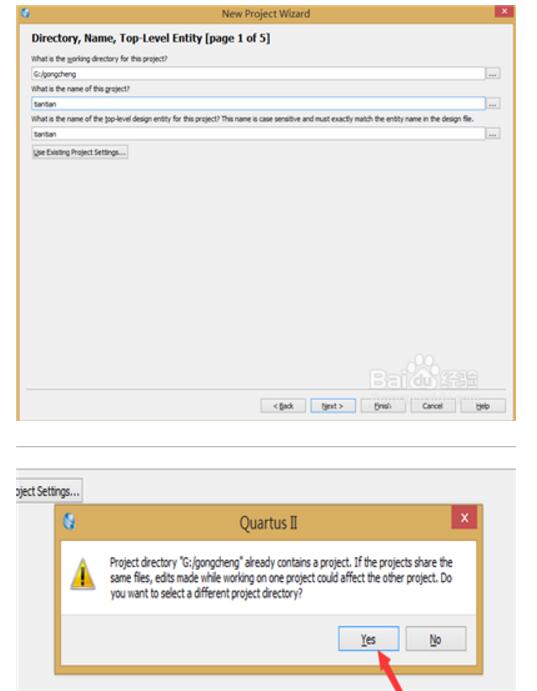
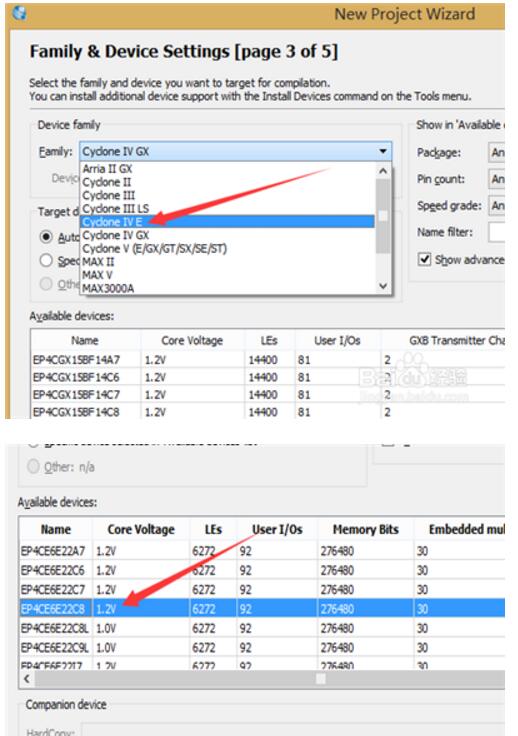
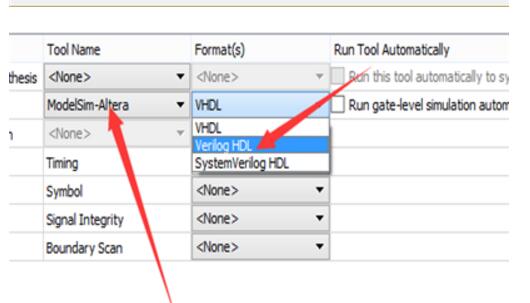
4, after the pop-up interface can be directly selected without changing the next step below the interface to know the next figure, according to the figure selection options (Cyclone IV E), select the chip type EP4CE6E22C8 chip and click Next after Figure 3 select (ModelSim- Altera and Verilog HDL options, click Next.
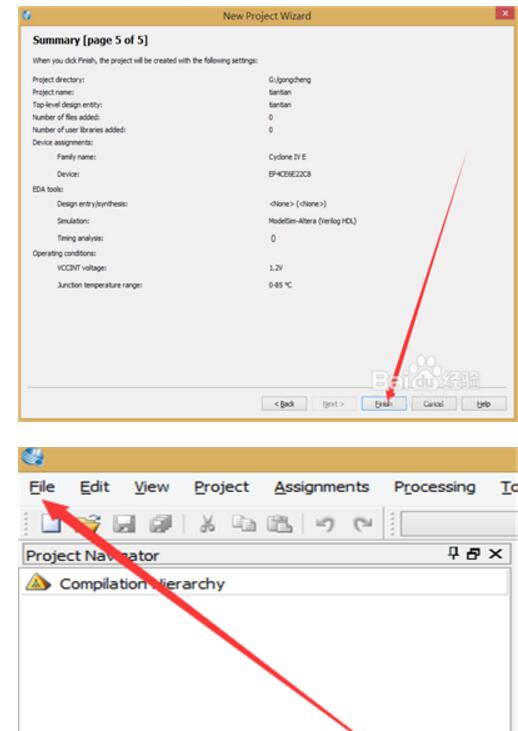
5. Finally click Finish on the new interface. Click File in the upper left corner again, select the first item in the menu, and then pop up a new interface. Select Verilog HDL File and click OK below. You can fill in the program you want to practice in the blank space.
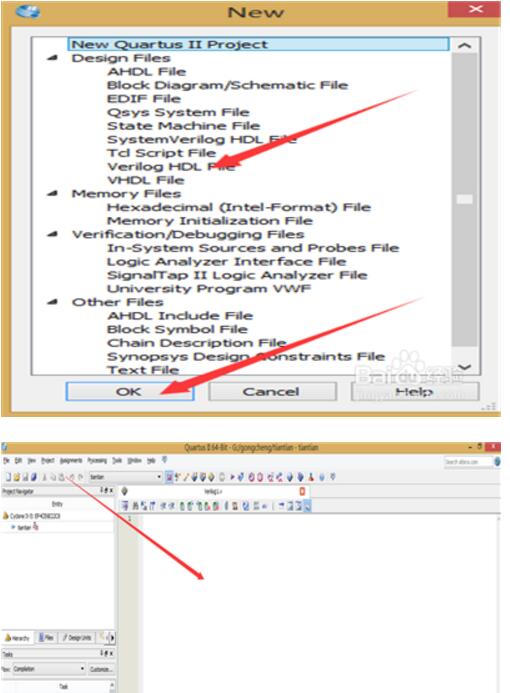
Any design is a Project. It is a good practice to put all the files under a project in a folder so that we can organize, use and extract files under different projects. The folder will be defaulted to Work Library by the EDA software, so the first step is to create a new folder based on your own habits.
Go down to the topic:
(1) New folder: My habit is to create and save the project on the D drive, I will name the folder additional counter, the path is D:\addition counter
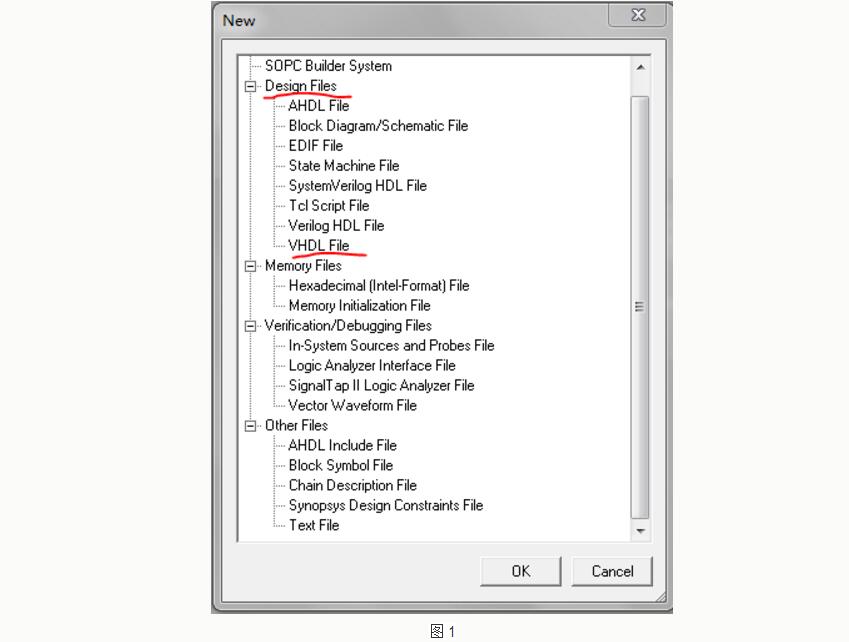
(2) Input source program: Open Quartus II, select menu File--"New--"Design Files--"VHDL File--"OK (as shown in Figure 1)
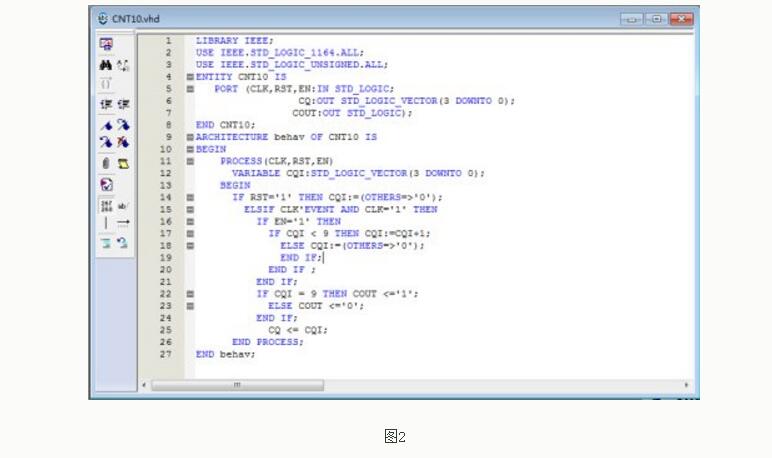
In the VHDL file compiler window type the program, as shown in Figure 2, the source program attached to the end of the article, you can directly copy and paste
(3) Save the file: It is a good habit to save one step after completing a step, so that even if an unexpected situation occurs, the previous efforts will not be lost. Select File-->Save as, select the save path, that is just the newly created folder D:\addition counter, the file name should be consistent with the entity name, that is, CNT10.vhd, click Save will pop out "Do you want to create a New project with this file?" Select "Yes" to enter the following interface
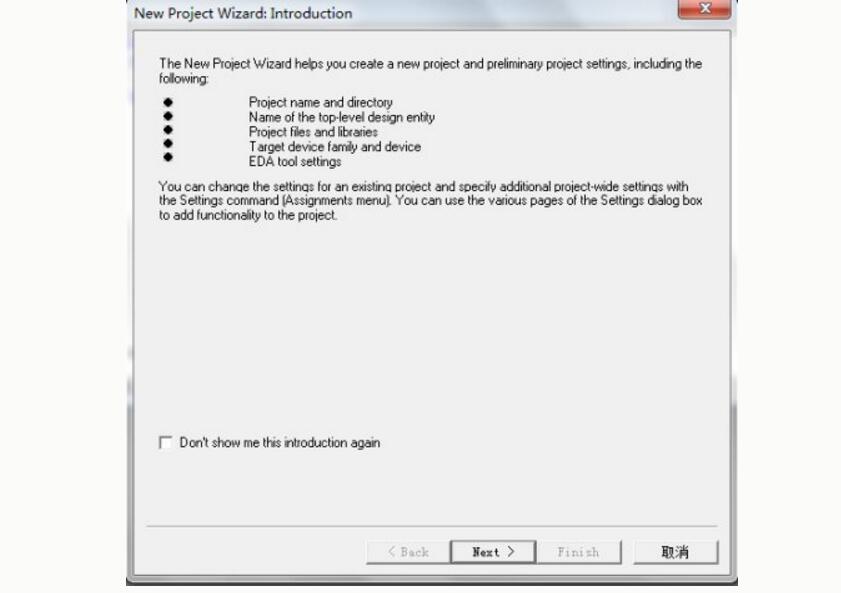
Click Next, enter the "Project Settings" dialog box, as shown
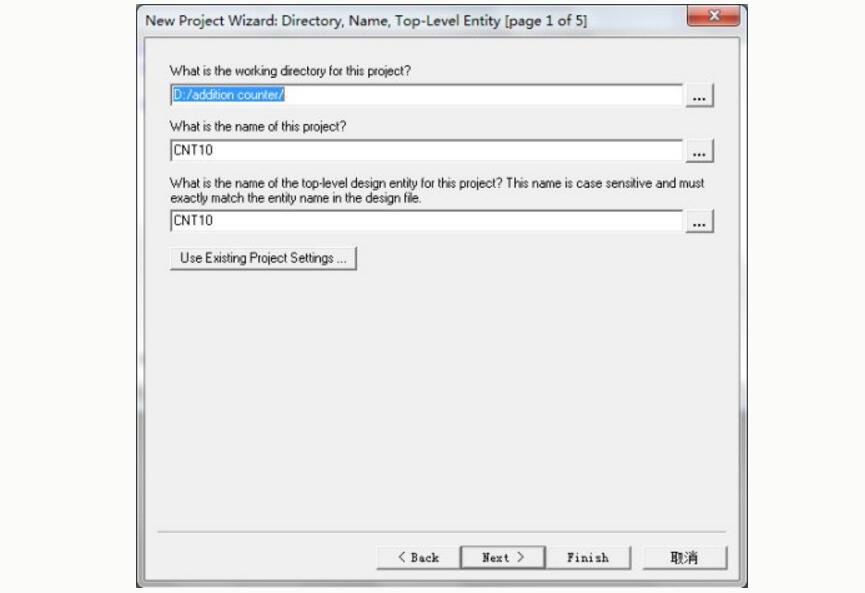
The first line indicates that the project folder is D:\addition counter, and the second line is the project name, which can be consistent with the entity name of the top-level file, or can be taken from another name. The third line is the entity name of the top-level file of the current project. .
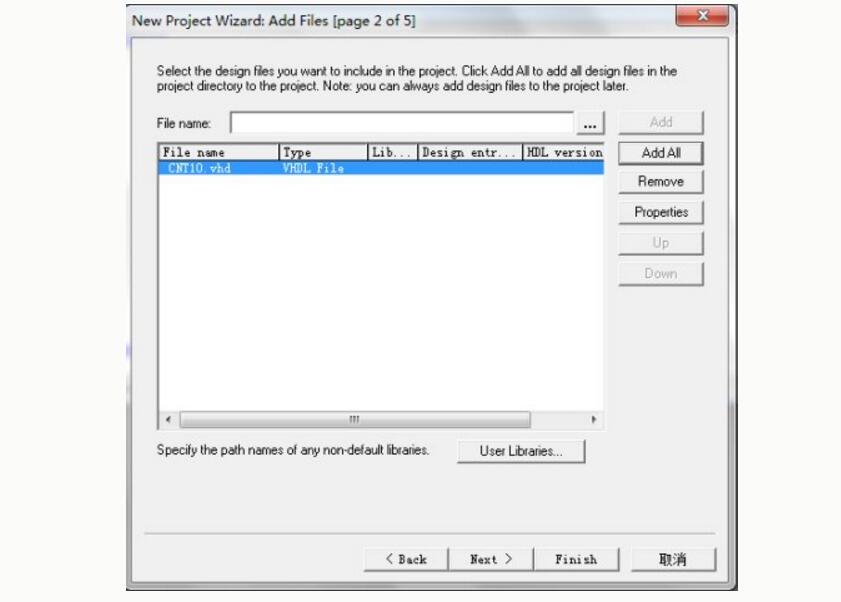
Click next, enter the ADD FILE dialog box, as shown in the figure, click the Add All button to add all VHDL files related to the project into the project, or click “Add...†Selectively add, follow this step to create the project , The project has automatically added all the files, you can directly click on the next, when you first create the project directly, you need to add your own
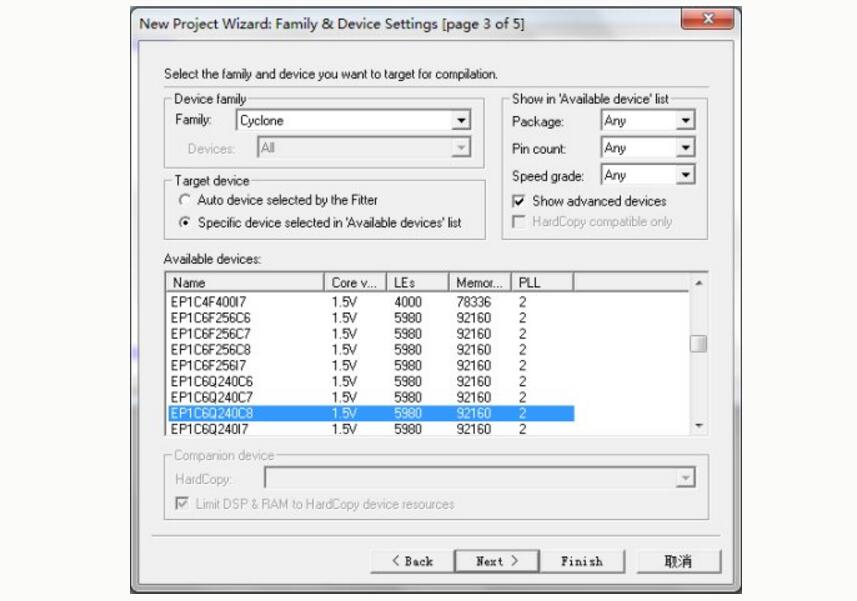
(4) Select the target chip: We chose Freescale's Cyclone series of EP1C6Q240C8, in the Family column, select the chip series - Cyclone, then the software will be in the Avalable devices column in the series of all chips, look for EP1C6Q240C8 and select, click Next, as shown
(5) Tool settings: Enter EDA tool settings window, there are three options, namely select the input HDL type and synthesis tools, select simulation tools, select timing analysis tools, which is in addition to all design tools Quartus II self-contained plus The tool, if not selected, means only select all the Quartus II self-contained design tools. No other design tools are needed. You can click Next.
(6) End the setting: Enter the "Project Settings Statistics" window and list the settings related to this project. After the settings are completed, click Finish.
Second, pre-compilation settings1, select the target chip and select the configuration method of the device
Select Assignments - - Device in the menu bar, pop-up dialog box, because the target chip has just been selected when the project was created, so directly into the working mode of the selected configuration device, click Device & Pin Options, as shown
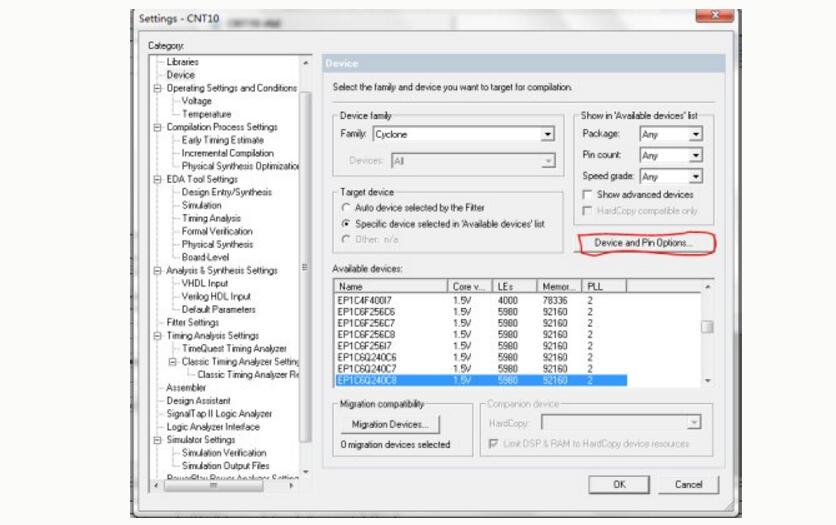
The Device & Pin Options window pops up. Set the General, Configuration, Programming File, and Unused Pins items as shown in the figure.
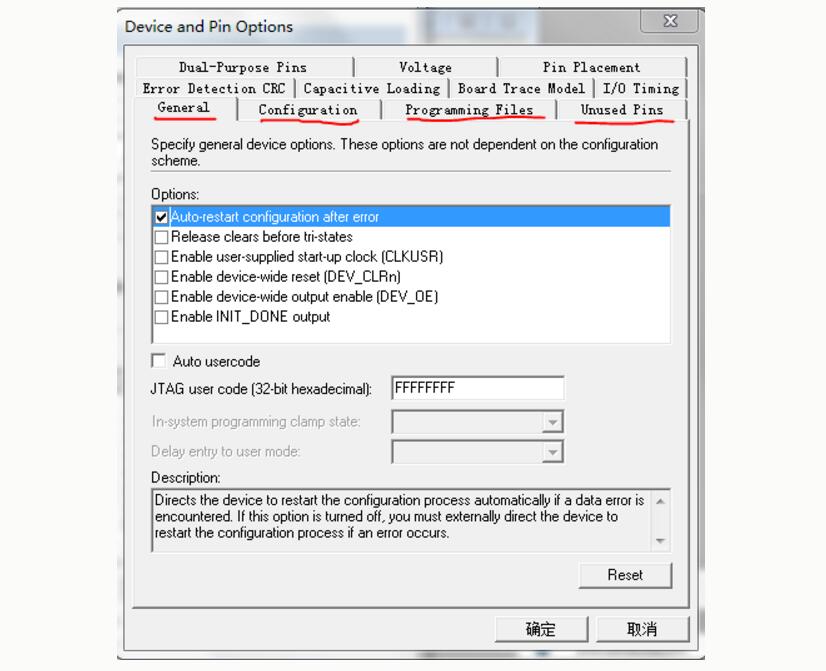
In the General item, select Auto-restart configuration after error in the Options column to automatically reconfigure the configuration of the FPGA. Whenever any of the Options column is selected, the option box below has the option. Description for reference.
In the Configuration item, check the Generate compressed bitstreams field to generate a compressed configuration file.
The Programming File option remains the default
The Unusual Pins item sets all unused pins high, ie As Input tri-stated
Click OK
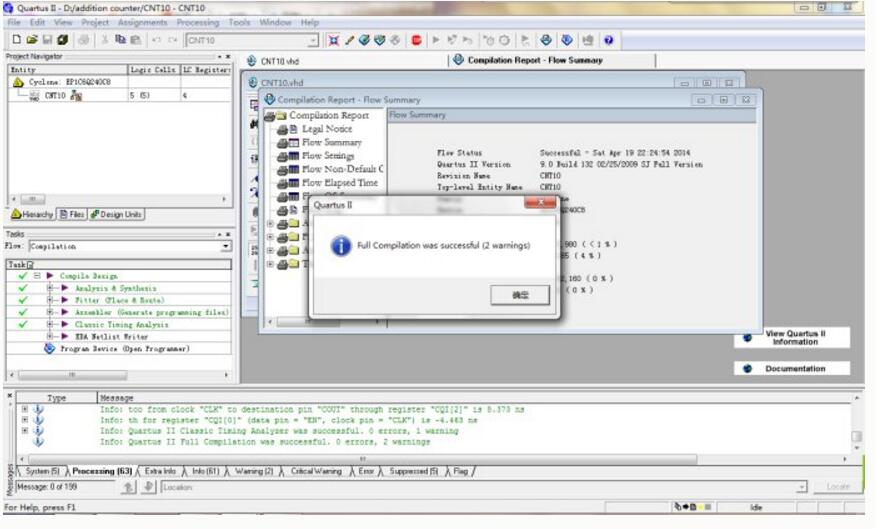
Third, compile After you configure it, you can compile it. Click 
Start full compilation
After the successful compilation of the interface as shown
(1) Open the waveform editor: File--"New--"Verification/Debugging Files--"Vector Waveform--" OK, a blank waveform editor appears, as shown
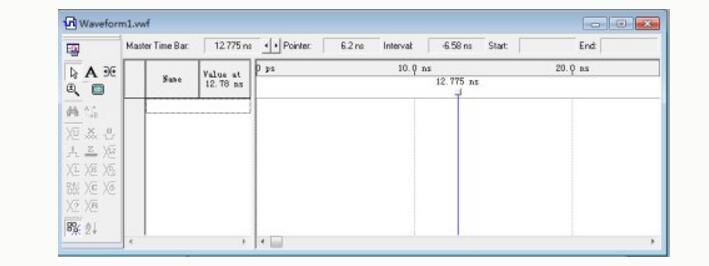
(2) Set the simulation time zone: Edit--"End Time Enter 50 in the Time column, select "us", click OK and save the waveform file
(3) Select the port signal name of the engineering CNT10 into the waveform editor: View-->Utility windows-->Node Finder, select Pins:all (usually the default option) in the Filter box, and then click List. All pins as shown
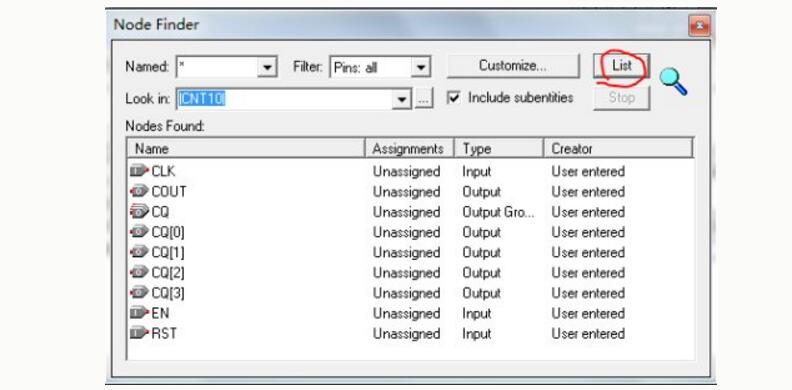
Drag an important port name into the waveform editor and close the window
(5) Edit the input waveform:
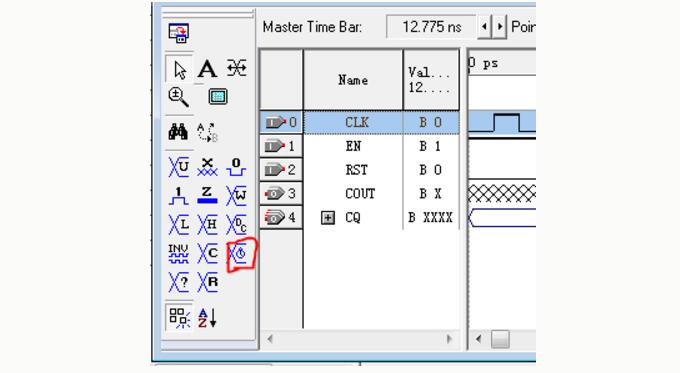
Click the clock signal name CLK of the window to make it blue, and then click the clock setting button in the left column, as shown in the figure
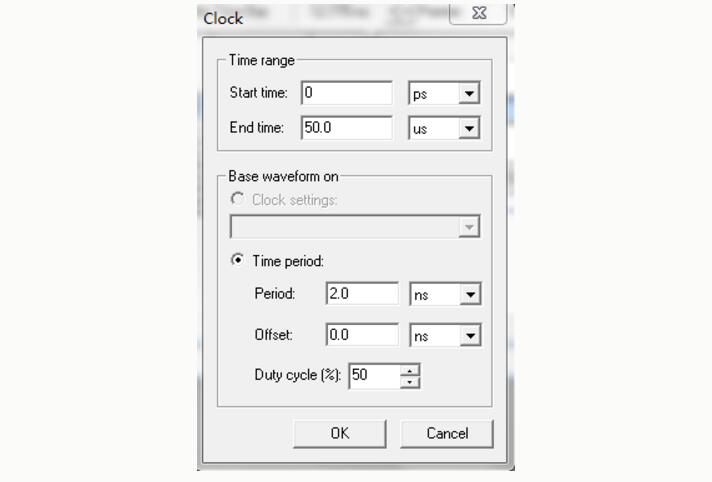
Duty Cycle default 50, clock period Period 2us, click OK, as shown
In the initial design, the default time interval may be relatively small. It does not show a square wave but a straight line. Then you need to adjust the timeline and click the icon of the left column magnifying glass.  , put the mouse on the waveform, the left button to zoom in, the right button to zoom out, right click to see a clear square wave. On the waveform interface of the other input ports, circle the place where you want to set the height, and click "1" in the left column.
  , edit the input waveform according to this method, as shown
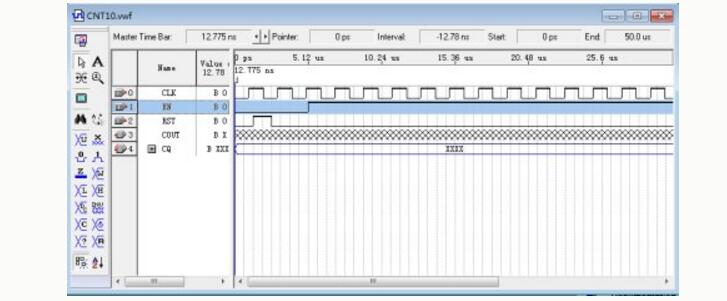
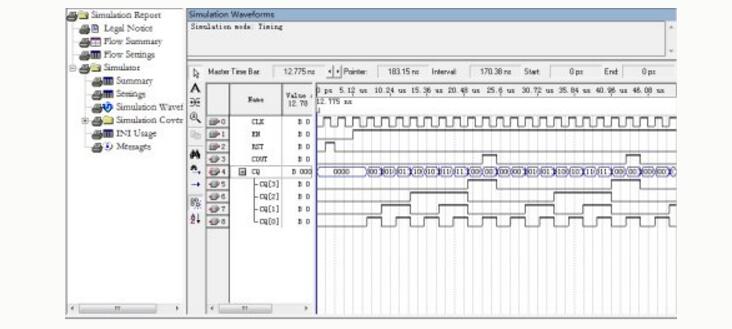
(6) Start the simulator: Processing--"Start Simulation, until the simulation was successful, the simulation is over, and then it will automatically pop up
"Simulation Report", click the "+" next to the output signal "CQ" to expand all the signals in the bus, which will help us to observe and analyze the waveform as shown in the figure.
Tools--"Netlist Viewers--" RTL Viewer, the results as shown
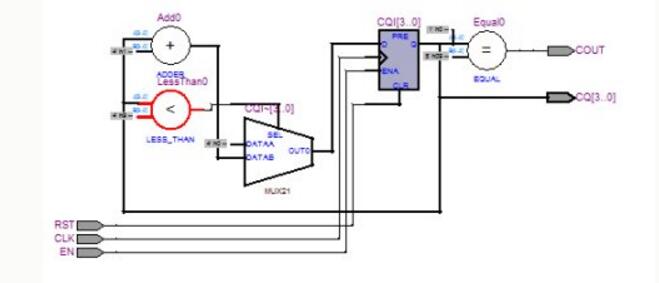
Attachment 1: Source code
LIBRARY IEEE;
USE IEEE.STD_LOGIC_1164.ALL;
USE IEEE.STD_LOGIC_UNSIGNED.ALL;
ENTITY CNT10 IS
PORT (CLK, RST, EN: IN STD_LOGIC;
CQ: OUT STD_LOGIC_VECTOR(3 DOWNTO 0);
COUT:OUT STD_LOGIC);
END CNT10;
ARCHITECTURE behav OF CNT10 IS
BEGIN
PROCESS(CLK,RST,EN)
VARIABLE CQI: STD_LOGIC_VECTOR(3 DOWNTO 0);
BEGIN
IF RST='1' THEN CQI:=(OTHERS="'0');
ELSIF CLK'EVENT AND CLK='1' THEN
IF EN='1' THEN
IF CQI "9 THEN CQI:=CQI+1;
ELSE CQI: = (OTHERS="'0');
END IF;
END IF;
END IF;
IF CQI = 9 THEN COUT ="='1';
ELSE COUT "='0';
END IF;
CQ "= CQI;
END PROCESS;
END behav;
ZGAR Aurora 2500 Puffs
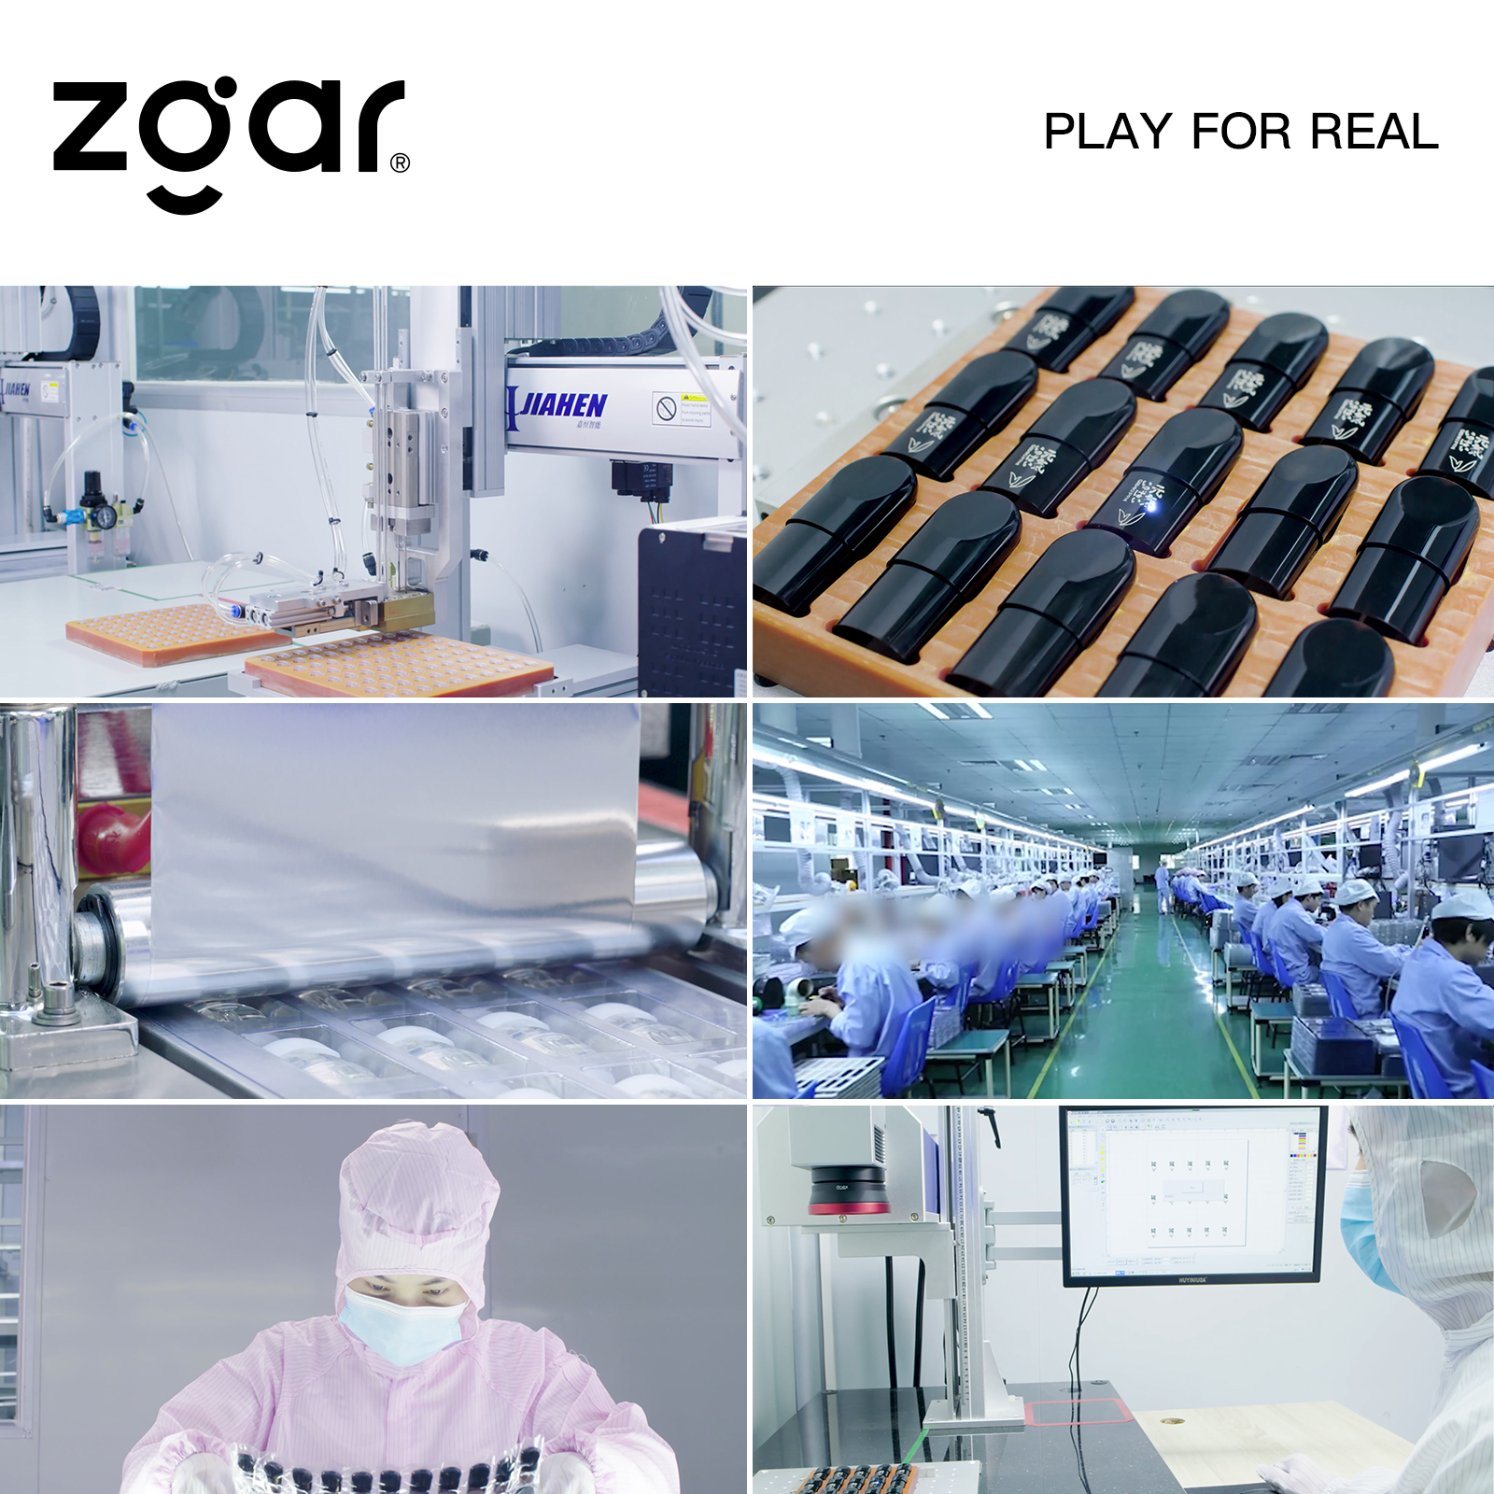
ZGAR electronic cigarette uses high-tech R&D, food grade disposable pod device and high-quality raw material. All package designs are Original IP. Our designer team is from Hong Kong. We have very high requirements for product quality, flavors taste and packaging design. The E-liquid is imported, materials are food grade, and assembly plant is medical-grade dust-free workshops.
Our products include disposable e-cigarettes, rechargeable e-cigarettes, rechargreable disposable vape pen, and various of flavors of cigarette cartridges. From 600puffs to 5000puffs, ZGAR bar Disposable offer high-tech R&D, E-cigarette improves battery capacity, We offer various of flavors and support customization. And printing designs can be customized. We have our own professional team and competitive quotations for any OEM or ODM works.
We supply OEM rechargeable disposable vape pen,OEM disposable electronic cigarette,ODM disposable vape pen,ODM disposable electronic cigarette,OEM/ODM vape pen e-cigarette,OEM/ODM atomizer device.
Aurora 2500 Puffs,Pod System Vape,Pos Systems Touch Screen,Empty Disposable Vape Pod System,2500Puffs Pod Vape System
ZGAR INTERNATIONAL(HK)CO., LIMITED , https://www.zgarvape.com